Build From Plans – Part 1
Getting Started
Plan on a few days to finish the press below. It is recommended to have a second person help out as several steps could use one person holding while the other person attaches.
Make sure your 4-color press is precise and sturdy:
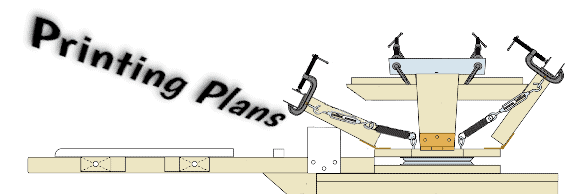
The sturdiness and precision of the press is important for the success of multi-color images, so it’s important to be as accurate as possible in your measurements, particularly once you get to the arms. You may want to use wood glue at each joint in addition to screws so that the press is as stable as possible, but this does make it difficult to take apart should you make a mistake. You may also want to pre drill holes before putting in the screws to avoid splitting of the wood (use a bit that’s slightly smaller than the screw). This table is designed for a six foot tall person. To alter it for someone of a different height, adjust parts N and O accordingly.
Q: Can this press be made in a table-top version? A: Yes, just forgo making the legs and buy some large clamps or rachet straps to hold it in place.
Tools You’ll Need for the build:
| Power Drill & Screwdriver | Miter Saw – Power or Hand saw |
| Wood & Metal bits | Table Saw or Circular Saw |
| Yardstick or Measuring Tape | Electric Sander. (It can be done with hand sanding,) |
| Workbench Vise or a Drill Press | Pencil |
| Level | Square |
| Clamps | Wood Glue |
| Metal Glue (Something like “JB Weld”) | Paper or Card Stock |
Materials Needed:
In the diagram below you’ll find the dimensions of all the lumber you’ll need. The most important thing regarding the thickness of your wood is that the sum of the width of pieces B, F and the lazy susan turntable is equal to the sum of the thickness of pieces I and U. This will help align everything so your screens float just the perfect height above your shirts for off-contact printing. You should be able to cut all your 2 x 4 pieces out of six 8-foot lengths, so I’d recommend buying seven to be safe. They should all be good, straight pieces, but it is especially important to find a perfectly straight piece for parts T and U.
Note: Part D below is not listed in the instructions. It is a substitute for part K if you choose not to buy a 1 x 4 and would prefer to use your existing plywood.
Note 2: If you can’t find coated shelving with a rounded edge, you can create the rounded edge yourself. This is mostly important for parts H. The platen (part G) doesn’t specifically need one rounded edge, but rather just needs to be smoothed at the corners so your shirts don’t catch on it.
Note 3: The long dimension for part O refers to the length of either side of the parallelogram, NOT the overall length of the board.

Hardware Needed:
Below you’ll find a list of all hardware needed for the project. For convenience and a discounted price, you can buy it all in one place here: discount screen printing hardware packages. Otherwise most of it can be found at your local hardware store, though you may find they don’t have the total quantity of the c-clamps or springs on hand. You’ll also need to go to a specialty woodworking store to find the swivel (lazy susan). Make sure you get a heavy duty, 6″ x 6″ x 3/4″” model or you’ll compromise the effectiveness of your press.
| QTY | SIZE | Item | QTY | SIZE | Item | |
| 1 LB | 2″ | Wood Screw | 6 | 2.5 or 3″ | Wood Screws | |
| 8 | 2″x1″ | Metal C-Clamps | 8 | 5/8″ x 3 1/4″ x .072″ | Springs | |
| 8 | 1/4″ x 3 1/4″ | Lag Eye Screws | 4 | 3/16″ x 1 3/8″ or 2 1/16″ | Lag Eye Screws | |
| 4 | 1/4″ x 1 1/4″ | Hex Cap Bolts | 4 | 1/4″ x 1 1/4″ | Hex Cap Bolts | |
| 2 | 3/8″ x 6 34/4″ or 7″ | Hex Cap Bolts | 2 | 3/8″ x 3″ | Carriage Bolt | |
| 8 | 1/4″ | Hex Nuts | 2 | 3/8″ | Hex Nuts | |
| 4 | 1/4″ | Washers | 6 | 3/8″ | Washers | |
| 8 | 1/4″ | Fender Washers | 2 | 3/8″ | Wingnuts | |
| 1 | 6″ x 6″ x 3/4″ | Lazy Susan Turntable |
Making the Table for the Printing Press:
Step 1: Cut all your lumber, marking each piece with the appropriate letter to make assembly easier. We’ll start by assembling the table itself. First, lay down parts L and Q and attach the legs (part N) as shown (fig. a). Make sure that your angles are perfectly square. Where parts L extend past the legs, use a piece of 2 x 4 to check that the bits that extend are exactly equal to the smaller width of the wood.

Step 2: Attach the thin sides of parts M to part A as shown in fig. b. Use only glue and clamps for now. Again using only clamps and glue, set parts A and M on top of the two legs you built in Step 1, so that parts L and M form a square around the perimiter of A. This is shown from above in fig. c. (Dotted lines indicate parts beneath.) Once you feel comfortable with the fit, Go ahead and screw parts L into M, and A into both L & M from the top.

Step 3: Now you have a standing, albeit weak, table. Attach parts P to legs N as shown in fig. d. Do it in the front and back, both times keeping part P flush to the outside, as seen from above in fig. e. Note: Parts P act as a support beam and rests for a shelf (part E). It can be lowered or raised to suit your preference, and additional shelves may be added if desired.

Step 4: Attach part O to the outside of both sides of the table (fig. f). Make sure you orient them as shown for maximum support. Now secure shelf E onto crossbeams P to act as a shelf. Add part K to the back to help keep items from falling off. You are now finished with the table itself. It should be plenty sturdy with no give at all.

Part 1: Build From Plans - Part 1
Part 2: Build From Plans - Part 2
Part 3: Build From Plans - Part 3
Part 4: Build From Plans - Part 4